|
Improving the CG-5 Equatorial Mount
Right Ascension Axis, Part 1
I learned a great deal by dismantling the Dec section of my CG-5, and so the RA section went more quickly. The techniques for cleaning, deburring, and polishing the RA components are the same as for the Dec section. We'll concentrate, then, on the disassembly of the RA axis and any unusual problems you might encounter.
NOTE: A new version of the CG-5 appeared in 1999 with a different internal design of the RA axis, including two ball bearings. According to owners of the new version, the disassembly procedure is not significantly different from the descriptions given here. However, I have no personal experience with the "new" CG-5.
Start by removing the worm assembly from the RA housing. As with the Dec worm, remove the four large hex head screws, but leave the small set screw in place.
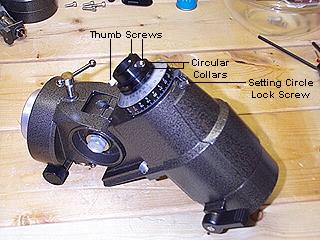
At the bottom of the RA assembly, remove the three knurled thumb screws that hold the polar axis scope, and also remove the setting circle lock screw. Then, find the two tiny slotted screws in the two circular collars beneath the thumb screws. Loosen, but do not remove the slotted screws. Unscrew and remove the first collar. The second collar can then be removed as well. Find and remove the plastic washer beneath the second collar.
|
Lift off the two settings circles. The RA shaft extension can now be unscrewed from the RA shaft, providing access to the ring nut. Remove the plastic washer under the shaft extension.
|
|

|

|
|
The RA ring nut is secured by three small hex head set screws (the Dec ring nut has only two set screws). These can be reached through the hole in the wall of the housing where the setting circle lock screw was removed.
Rotate the RA shaft until one of the set screws is visible through the hole. Loosen, but DO NOT REMOVE the set screw. Proceed to the second and third set screws, and loosen them.
The ring nut can now be unscrewed from the RA shaft. Refer to the declination section for more info about removing the ring nut and about the spanner tool that may be required.
There is a plastic washer under the ring nut. Carefully remove the washer, and set it aside. The RA shaft can now be removed from the RA housing.
|
RA Axis, Part 2 »»
|